Caspian Arms Recon Light Rail
Reviewed by Steve Shields (Wichaka, )
As promised by me some time ago, I would do a thread on installing a light rail made by Caspian Arms.........so lets go.
This install is on a Springfield Loaded model, owned by M1911 member Jazor. He bought the pistol from another M1911 member, Jammer Six. Jazor brought me the gun some time ago to go thru it, to make sure everything is reliable for duty use. As well as reliability work, I also installed an Ed Brown Maxi-Well. Its the combination 2 piece style, main spring housing & mag well.
Ok, on to the rail. He was wanting to either add a rail on the Loaded or purchase a Springfield MC Operator. I've seen the MC, and looks to be a very good gun for the money. People who know me on here, know I aint easily impressed by todays 1911's. Anyway, I mentioned this project to El Commandante and he obtained a donated rail from Caspian for this write up. So not only is Jazor getting a free rail, he's getting it installed for free as well........boy, will he owe both of us big time or what?
Here's the rail by Caspian:

Its a very study piece of solid steel, looks to be machined from barstock so you'll know it'll last.
The first thing most notice are the fingers on one end. These straddle the trigger guard, and am guessing to give the rail some lateral stability. There are 3 holes for mounting to the under side of the dust cover on the frame. The instructions for the rail can be seen on Caspians web site. It says "For a more permanent installation welding or silver solder is recommended" After installing the rail, I don't believe the rail will need to be welded or soldered. The rail matches the contour of the dust cover perfectly, for a excellent fit and look. Its very stable and tight to the frame, which Caspian should be commended for their attention to detail.
The first thing I did was check the fit before drilling the mounting holes. The fingers were not wide enough to straddle the trigger guard on the Loaded, yet it did fit all my Colt trigger guards. So taking out a #2 swiss.........after a few swipes it fit.

Jazor's choice for a weapon light was Streamlight's M3. I put the M3 on the most forward notch on the rail to get the rail to set back on the frame as far as I could get it. I sat it on the frame to get the proper fit of the light to the trigger guard. First thing I noticed is that the rail can not be pushed up to the trigger guard very far before the end of the M3 makes contact. So as you'll see in the following pic the M3 has about an 1/16" clearance.

You'll also notice how far the rail extends past the frame and light, and how much of the fingers are straddling the trigger guard. The rail can be ground back flush with the light to make it look better. I'm guessing that Caspian makes the rail this way so you can tailor fit the rail to the light you choose.

Ok, now that we know where to mount the rail, I scribed a line on the inside of the rail, where the end of the frame meets it. I took the light off put the rail back on and marked the holes for drilling.
I looked back on Caspians installation intructions and found that they show where to drill the holes. STOP RIGHT THERE! If you're going to install one of these, I would suggest doing what I did, use the light you're going to use as a guide where the rail needs to be mounted. If I used Caspians instructions, the rail would have been placed to far back against the trigger guard for the M3 to mount on the rail. Mount your light on the rail, place the rail on the frame, then make a mark as I did.
With the rail back on the frame and set where I put my mark, I marked each hole with a punch, where the screws holes would need to be drilled.

Caspian recommends using a #4x60 degree bit. I advise against this, that bit size is way too big. The frame where this rail mounts is fairly thin, so I want to keep as much meat as possible. I pre-drilled using a 5/64" bit (see above pic), then finished with a 9/64" drill. This fits the provided screws perfectly.

Now to the inside of the dust cover. To keep the screw heads from contacting the dust cover on the slide, they will need to counter sunk. I used a 5/16" bit for this, and it worked perfectly.

After putting some countersink on the inside of the frame for the screws, shown here:

I installed the rail with the screws to see if I had the heads sunk enough.......sure enough, they look fine.

But as you can see, the scews are a bit long.......so trimmed they will be.

Much better.......

So there you go......step by step instructions on the install.
Here's Jazor's Springfield Loaded put back together.......
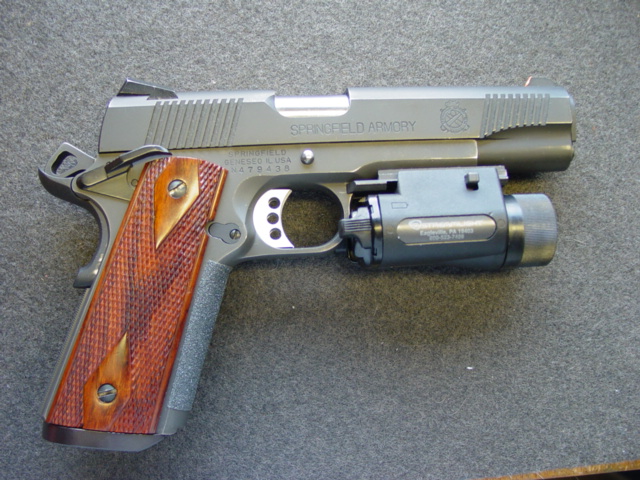

Before I get lots of questions about that type of mag release on a duty gun in a holster........no, it does not interfer with the holster in anyway, nor does it cause any problems with the draw or re-holster. Jazor has fairly large hands, yet his thumb still can't quite get to the mag release without repositioning. This one is made by Wilson, and it really does work.
I too was very skeptical when I installed one for another Deputy. He has been carrying his on duty for about a year now, with ZERO problems.
A couple points to mention;
1) Make sure the screws that hold the rail are sunk deep enough to clear the dust cover on the slide.
2) This type of rail hangs a bit lower than an integral type that's made into frames, thus causing some holster problems. Jazor brought his Safariland holster over tonight, and the gun fits very tight, because the light hangs a bit lower than the holster is made for. With some small modifications to the holster, we got it fitting just fine. The holes where the holster mates with the belt carrier will need to be elongated a bit to allow the holster to open up and give a bit more room. There's a small ledge inside the holster that also caused some problems.........he trimmed this back and that helped as well.
Overall it appears to be a good rail for the money, as it doesn't need any adapters as some others on the market. If you have a 1911 that you want to mount a tac light, give this one a look..........it's cheaper than buying a whole new gun. This one is a bit longer than others I've seen, as it hangs out past the frame a bit.........but it also doesn't take a backseat in quality to any others either.
If you have any questions, fire away...........
Sources
![]()
Caspian Arms
75 Cal Foster Dr.
Wolcott, VT 05680-0173
USA
Phone Number: 1-802-472-6454
Fax Number: 1-802-472-6709
E-Mail: caspianarm@aol.com
Web Site: http://www.caspianarms.com
| Home - Volume 1 (2006) - Issue 1 (Summer '06) - Caspian Arms Recon Light Rail |